Door Notice
If Cleveland Water is working on your street, you may have received a door notice regarding lead. Below are descriptions of the 3 different types of notices that customers can receive. If you have questions about the door notices, please call our Lead Inquiry Line at 216-664-2882.
Go to:
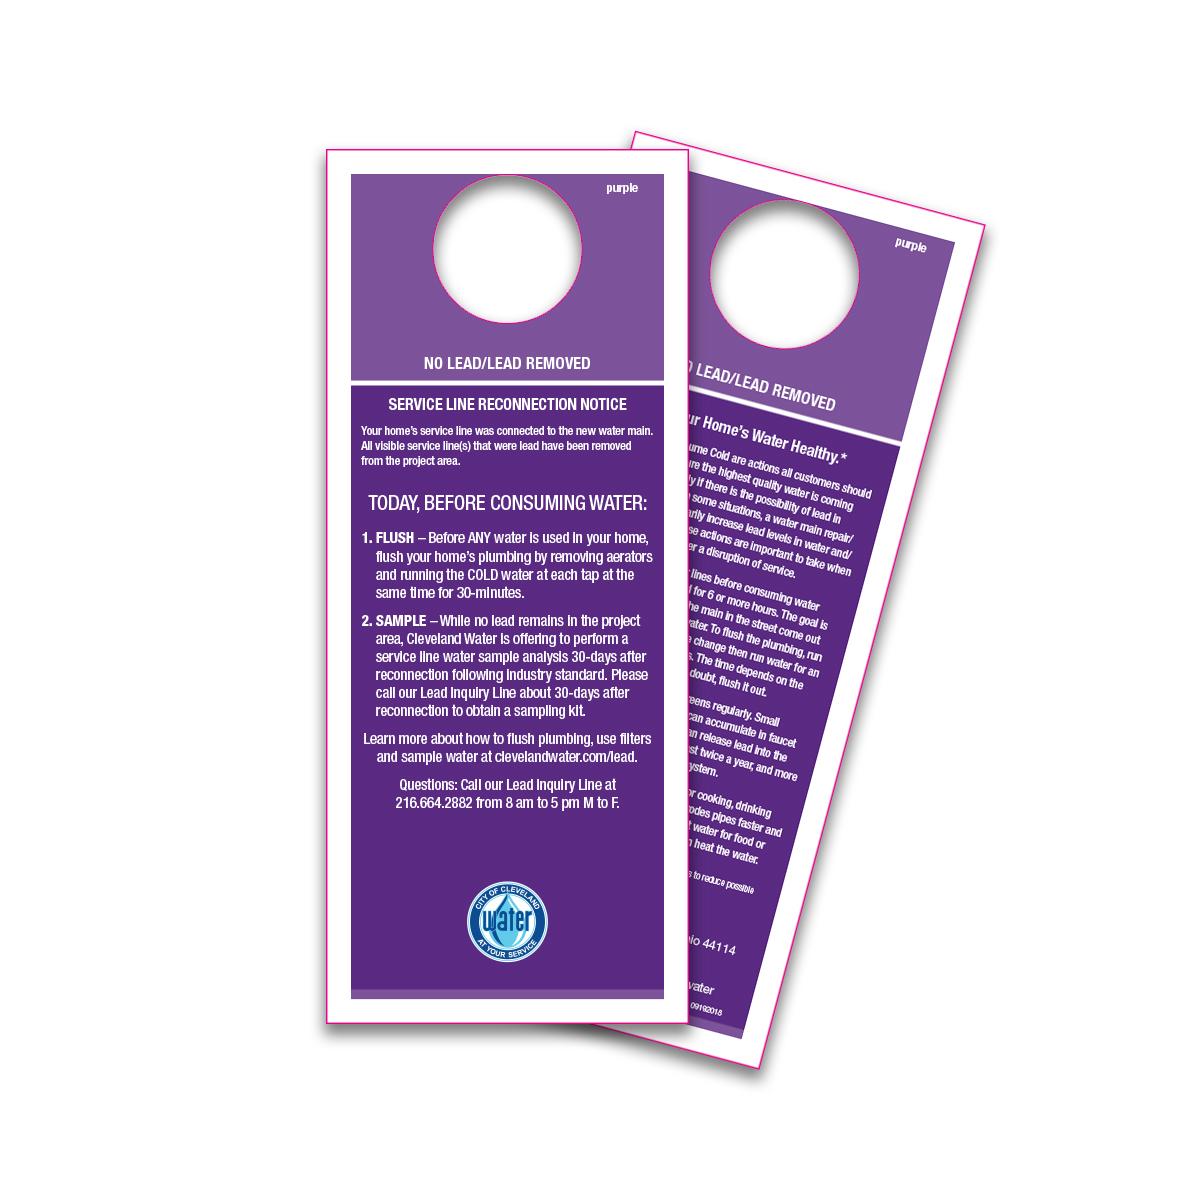
Purple Door Notice
No Lead/Lead Removed
If you received a two-tone purple door notice, it means that your service line has been reconnected to a water main in a project area that previously had lead service lines and all have been removed. If “No Lead” is circled at the top of your door hanger, your service line is not lead. If “Lead Removed” is circled, your city-owned service line was lead and has been replaced with copper.
- You should perform a 30-minute cold water full house flush which includes removing and cleaning aerator screens.
- While no lead remains in the project area, we offer water sampling 30 days after your service line is reconnected upon request. If interested, please call our Lead Inquiry Line at 216-664-2882 after reconnection.
Resources
- Flushing Instructions
- Flushing Video
- Aerator Cleaning Instructions
- Cómo Limpiar Aireadores
- Aerator Cleaning Video
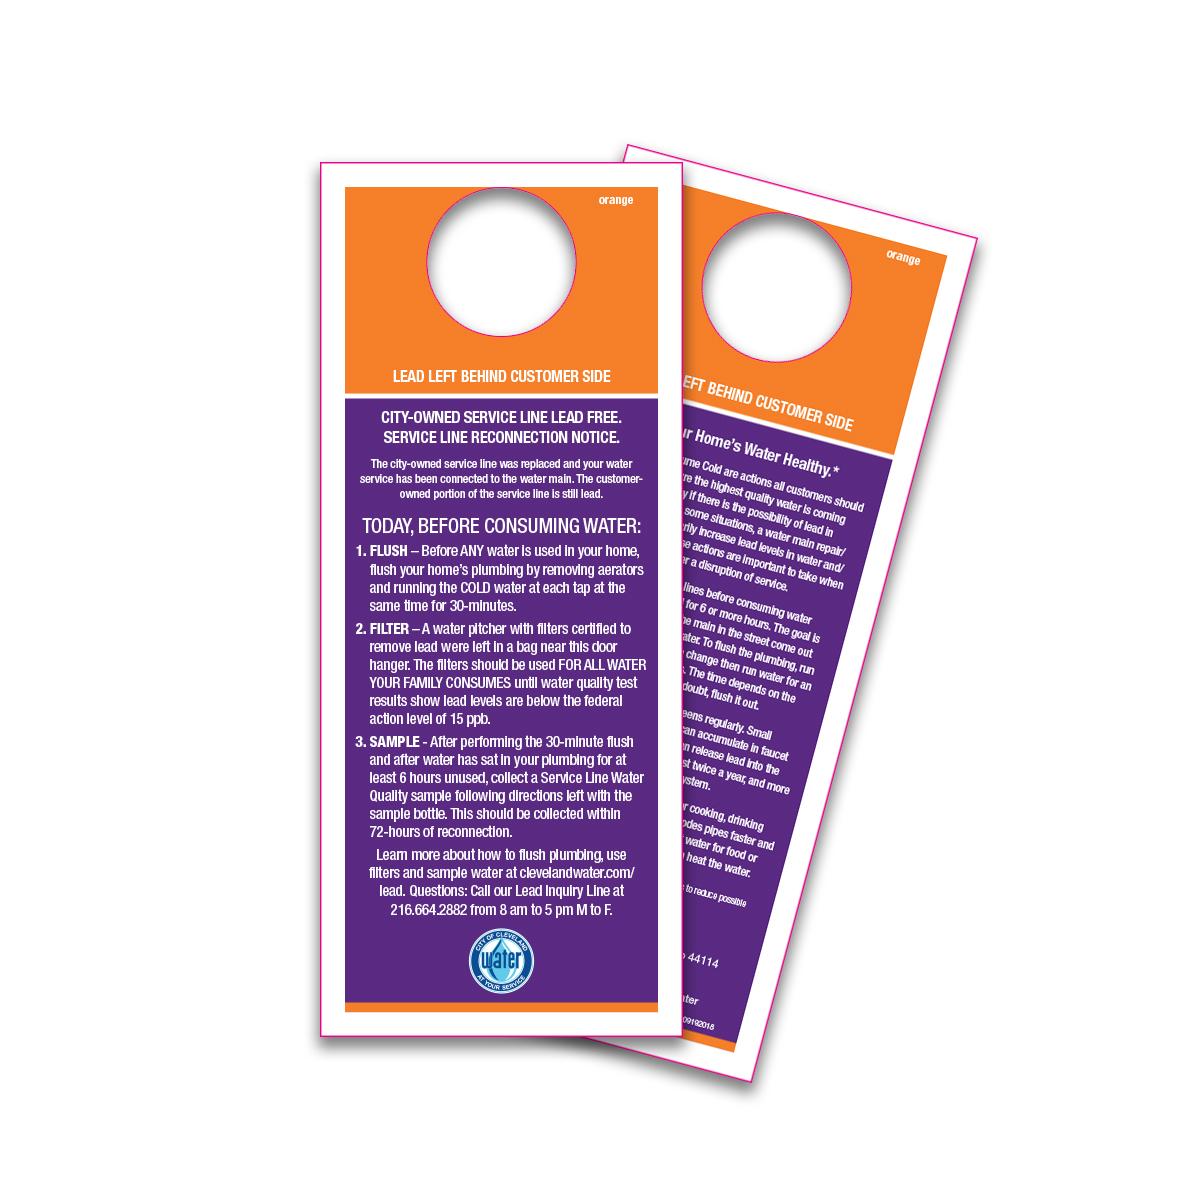
Orange Door Notice
Customer-Owned Lead Left Behind
If you have received an orange and purple door notice, it means that the city-owned service line has been replaced but your property still has a customer-owned lead service line.
You should:
- Flush your home's plumbing prior to any water being used by removing aerators and running the cold water at all faucets at the same time for 30 minutes.
- Use the lead-filtering water pitcher provided for all water consumed in the house.
- Collect a water quality sample following the directions left with the sample bottle. This should be collected within 3 days of reconnection after performing the 30-minute flush and after water has sat in your plumbing for at least 6 hours.
- Perform a regular 5-minute cold water flush at your kitchen faucet after water has not been used for 6 or more hours.
- Perform a 30-minute cold water full house flush every 2 weeks for 6 months or until water quality test results indicate that unfiltered lead levels in your home’s water are below 15 parts per billion.
Resources
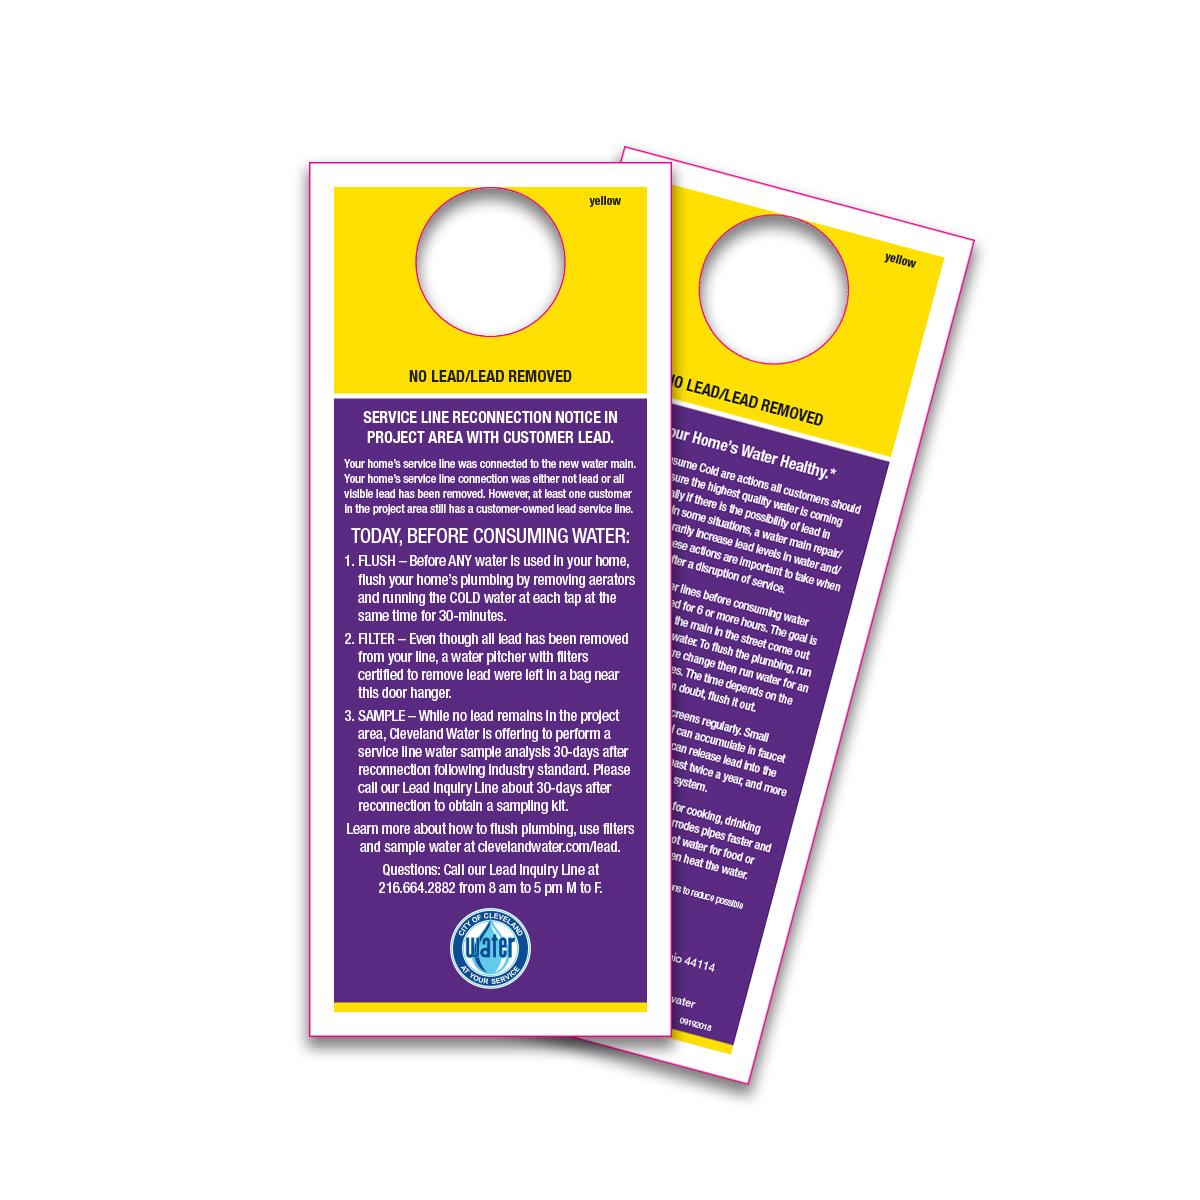
Yellow Door Notice
No Lead/Lead Removed
If you received a yellow and purple door notice, it means that your property’s service line was either not lead or that lead was removed. However, at least one property in the project area may still have a customer-owned lead service line. If “No Lead” is circled at the top of your door hanger, your service line is not lead. If “Lead Removed” is circled, your city-owned service line was lead and has been replaced with copper.
- You should perform an initial 30-minute cold water full house flush which includes removing and cleaning aerator screens.
- Even though there was no lead or lead has been removed, a water pitcher with 3 months of filters certified to remove lead was left at the property.
- While no lead remains in the project area, we offer water sampling 30 days after your service line is reconnected upon request. If interested, please call our Lead Inquiry Line at 216-664-2882 after reconnection.
Resources
Cold water flushing should occur immediately after water service is restored anytime lead has been removed or still remains in any portion of the service line, and when customers are connected to a new water main after being on a bypass. When lead service lines are replaced, small lead particles may dislodge due to vibrations and movement of service lines and plumbing. Flushing cold water through all of your home’s plumbing at the same time for 30 minutes moves any potential lead particles out of the drinking water system and down the drain.
Do not use any hot water in your home until you flush your cold water lines. If you had or still have lead in your service line, using hot water first could pull lead particles into the hot water tank.
- Remove all aerator screens from every faucet and fixture in your home. Be sure to keep track of which aerator goes with which faucet.
- If a tub includes a showerhead, use the tub faucet to flush the plumbing. If a showerhead is the only way to flush a line, and if the showerhead cannot easily be removed, do not use the shower for flushing.
- Disconnect or bypass all faucet filters, under-counter treatment units, and full-house treatment systems.
- Find the faucet that is closest to where the service line enters your home. If this is an outdoor spigot, turn this on first as high as it goes. Otherwise, start in the basement or lowest floor of your home. Turn the COLD WATER on as high as it goes.
- Continue opening all faucets, including tubs, utility sinks, and outdoor spigots, until all faucets are open on all floors. Every faucet in your home should be on at the same time.
- After all faucets are on, let the water run for at least 30 minutes. Running the cold water should move lead particles, if they exist, out of the system.
- After 30 minutes, turn off the first faucet you opened. Then turn off all other faucets in the same order you turned them on until all cold water faucets are off.
- Clean and reattach the aerators to each faucet. If an aerator cannot be cleaned, do not reattach it. Use your faucet without the aerator until you can buy a replacement.
- If you have an under-counter or whole-house treatment unit, turn it back on.
Cleaning faucet aerators regularly and after disruptions in water service is important for maintaining the high quality of Cleveland Water that is delivered to your home.
Aerator screens are made of metal or plastic and attach to the end of the faucet. They enhance water pressure by dividing the flow into dozens of tiny streams. Aerators may accumulate tiny particles of sediment that have corroded from inside your home’s plumbing and hot water tank. Aerators should be cleaned at least twice a year and after disruptions in water service as part of the full house flush procedure.
During construction activities, small particles of solder and other material can dislodge from pipes and accumulate in faucet aerators. In cases where homes have lead service lines or plumbing, these particles may contain lead. Cleaning all faucet aerators is a critical step in protecting your family from potential lead exposure after a lead water service line replacement. If the aerator screen is not able to be cleaned, do not reinsert the screen into your faucet. Use the faucet without the aerator until you purchase a new screen insert.
Standard Aerator
- Unscrew the screen until it comes off by turning it clockwise. You may be able to unscrew standard aerators with your hand or you may need a wrench or other tool to help give you enough torch to loosen the aerator housing.
- Separate the parts of the aerator. You may notice a few small black, brown, white or copper-colored flecks on the screen. This is metal and plastic that has corroded from your plumbing system.
- Rinse all parts of the screen with water. If residue has accumulated on the screen or housing, soak the aerator parts in vinegar for approximately 20 minutes. Then, scrub all parts with a small clean brush.
- Reassemble the aerator and reattach it to the faucet.
- Test the faucet to ensure you installed it correctly.
Cache Aerator
- Cache aerators can be cleaned the same way as standard aerators, however, they require a special tool to remove them from your faucet.
- Aerator keys come in multiple styles and four different sizes. Standard is the size of a quarter. Junior is the size of a nickel. Tiny Junior is the size of a penny. Tom Thumb is the size of a dime.
- Most faucets with cache aerators are originally packaged with a flat metal or plastic tool that can be placed into the aerator grooves to unscrew it.
- If you do not have an aerator key set, one can be ordered online or by calling your faucet’s manufacturer.
- To remove a cache aerator, determine which key size fits.
- Insert the key’s groves into the aerators grooves.
- Then turn the key clockwise to unscrew the aerator.
- Once the aerator screen and housing are removed from the faucet, clean then reassemble.
If you received a yellow or orange door notice, you should have also received a water pitcher with filters in a bag near this door notice. The filters should be used for all water consumption purposes until water quality test results show lead levels are below 15 parts per billion.
- Customers are encouraged to develop a system to keep track of how many times they filled their reservoir to ensure filter cartridges are changed according to the manufacturer’s directions.
- Each cartridge can filter 40 gallons. The pitcher holds 8 cups at a time. This means you can completely refill the reservoir 80 times before you need to change the cartridge.
- Mark your calendar when you begin using a new filter.